Redux
理解JavaScript的纯函数
- 函数式编程中有一个非常重要的概念 纯函数,JavaScript符合函数式编程的范式,所以也有纯函数的概念
- 在React开发中,纯函数被多次提及:
- React组件被要求像一个纯函数(为什么是像,因为还有类组件)
- Redux中有一个reducer的概念,同样是要求必须是一个纯函数
- 掌握纯函数对于理解很多框架的设计都是有帮助的
一个纯函数必然具备以下特征:
- 确定的输入一定产生确定的输出
- 函数的执行过程中,不能产生副作用
为什么需要Redux
- JS需要管理的状态越来越多,越来越复杂
- 状态不断发生变化之间又相互依赖,这要求视图层也能同步更新
- React提供了自动更新视图的方法,但状态仍需要手动管理
- Redux可以帮我们管理状态,提供了可预测的状态管理
- 框架无关,体积只有2KB大小
Redux的核心理念
Redux的核心理念 Store
- 定义一个统一的规范来操作数据,这样就可以做到对数据的跟踪
list.push()list[0].age = 18
Redux的核心理念 Action
- Redux要求:要修改数据,必须通过Action来修改
- 所有数据的变化,必须通过派发(Patch)Action来更新
- Action是一个普通的JS对象,用来描述此次更新的type与content
const action = { type: 'ADD_ITEM', item: { name: 'Ziu', age: 18 } }
Redux的核心理念 Reducer
- 如何将Store和Action联系在一起?
- reducer是一个纯函数
- 完成的工作就是:将传入的state和action结合起来,生成一个新的state
patch=>reducer=>newState=>Store
Redux Demo
下例中,通过createStore创建了一个Store(已经不推荐了)
- initialState用于在调用
createStore时作为默认值传入reducer - 后续每次
store.dispatch都会调用reducer - 通过
reducer更新state中的数据
在React中,可以通过store.subscribe注册State变化的监听回调
- 当state发生变化时,通过调用
this.forceUpdate触发组件的更新 - 一般情况下,我们在
componentDidMount注册监听回调,在componentWillUnmount解除监听
// App.jsx
import React, { PureComponent } from 'react'
import store from './store'

export default class App extends PureComponent {
  componentDidMount() {
    // Subscribe to the store
    store.subscribe(() => {
      console.log('subscribe', store.getState())
      this.forceUpdate()
    })
  }

  componentWillUnmount() {
    store.unsubscribe()
  }

  render() {
    return (
      <div>
        <h1>App</h1>
        <p>Count: {store.getState().count}</p>
        <p>Name: {store.getState().name}</p>
        <button onClick={() => store.dispatch({ type: 'INCREMENT' })}> +1 </button>
        <button onClick={() => store.dispatch({ type: 'DECREMENT' })}> -1 </button>
        <button onClick={() => store.dispatch({ type: 'CHANGE_NAME', name: 'ZIU' })}>
          {' '}
          CHANGE_NAME{' '}
        </button>
      </div>
    )
  }
}// store/index.js
import { createStore } from 'redux'
// The initial application state
// This is the same as the state argument we passed to the createStore function
const initialState = {
count: 0,
name: 'Ziu'
}
// Reducer: a pure function that takes the previous state and an action, and returns the next state.
// (previousState, action) => newState
function reducer(state = initialState, action) {
console.log('reducer', state, action)
switch (action.type) {
case 'INCREMENT':
// NOTE: Keep functions pure - do not mutate the original state.
// Desctructure the state object and return a **new object** with the updated count
// Instead of `return state.count++`
return {
...state,
count: state.count + 1
}
case 'DECREMENT':
return {
...state,
count: state.count - 1
}
case 'CHANGE_NAME':
return {
...state,
name: action.name
}
default:
return state
}
}
const store = createStore(reducer)
export default store
进一步封装
可以将耦合在一起的代码拆分到不同文件中
- 将
reducer抽取出来reducer.js,简化store/index.js内容 - 将
action.type抽取为常量constants.js,使用时做导入,以保证一致性 - 将
action抽取出来actionFactory.js,用于外部dispatch时规范类型
// store/index.js
import { createStore } from 'redux'
import reducer from './reducer'

const store = createStore(reducer)

export default store// constants.js
export const INCREMENT = 'INCREMENT'
export const DECREMENT = 'DECREMENT'
export const CHANGE_NAME = 'CHANGE_NAME'// reducer.js
import * as actionType from './constants'
const initialState = {
count: 0,
name: 'Ziu'
}
export default function reducer(state = initialState, action) {
switch (action.type) {
case actionType.INCREMENT:
return {
...state,
count: state.count + 1
}
case actionType.DECREMENT:
return {
...state,
count: state.count - 1
}
case actionType.CHANGE_NAME:
return {
...state,
name: action.name
}
default:
return state
}
}// actionFactory.js
import * as actionType from './constants'
export const increment = () => ({
type: actionType.INCREMENT
})
export const decrement = () => ({
type: actionType.DECREMENT
})
export const changeName = (name) => ({
type: actionType.CHANGE_NAME,
name
})// App.jsx
import React, { PureComponent } from 'react'
import store from './store'
import { increment, decrement, changeName } from './store/actionFactory'
export default class App extends PureComponent {
componentDidMount() {
store.subscribe(() => this.forceUpdate())
}
componentWillUnmount() {
store.unsubscribe()
}
render() {
return (
<div>
<h1>App</h1>
<p>Count: {store.getState().count}</p>
<p>Name: {store.getState().name}</p>
<button onClick={() => store.dispatch(increment())}> +1 </button>
<button onClick={() => store.dispatch(decrement())}> -1 </button>
<button onClick={() => store.dispatch(changeName('ZIU'))}>CHANGE_NAME</button>
</div>
)
}
}Redux的三大原则
单一数据源
- 整个应用程序的状态都被存储在一棵Object Tree上
- 且这个Object Tree只存储在一个Store中
- 但Redux并不强制限制创建多Store,不利于数据维护
- 单一数据源有利于整个应用程序的维护、追踪、修改
State属性是只读的
- 允许修改State的方法只有patch action,不要直接修改State
- 确保了View或网络请求都不能修改State
- 保证所有的修改都能被追踪、按照严格的顺序执行,不用担心竞态(race condition)的问题
使用纯函数来执行修改
- 通过reducer将旧State与新State联系在一起,并且返回一个新的State
- 随着应用程序复杂程度增加,可以将reducer拆分为多个小的reducer,分别用于操作不同State Tree的某一部分
- 所有的reducer都应该是纯函数,不能产生任何的副作用
优化重复代码
当编写了一些案例的时候会发现,React结合Redux时会编写很多重复的代码
在每个需要用到Redux中状态的组件中,都需要在不同生命周期做添加订阅/解除订阅的处理,组件初始化时还要从store中取最新的状态
针对重复代码的问题,可以使用之前学到的高阶组件来做优化
Redux官方提供的库react-redux,可以让我们更方便的在React中使用Redux
npm i react-redux在Profile组件中,通过高阶函数connect实现的
将store中需要的状态通过mapStoreToProps转为props,并将需要使用store中状态的组件传入调用connect返回的函数中
在Profile组件中就可以从props中获取到store中的状态
// App.jsx
import React, { PureComponent } from 'react'
import { Provider } from 'react-redux'
import store from './store'
import Profile from './Profile'

export default class App extends PureComponent {
  render() {
    return (
      <Provider store={store}>
        <div>
          <h2>App</h2>
          <Profile></Profile>
        </div>
      </Provider>
    )
  }
}// Profile.jsx
import React, { Component } from 'react'
import { connect } from 'react-redux'
// mapStateToProps is a function that
// takes the state of the store as an argument
// and returns an object with the data that the component needs from the store.
// component will receive the data as props.
const mapStateToProps = (state) => ({
count: state.count
})
export default connect(mapStateToProps)(
class Profile extends Component {
render() {
return (
<div>
<h2>Profile</h2>
<p>Count: {this.props.count}</p>
</div>
)
}
}
)我们刚刚只是完成了对State的映射,将Store中保存的全局状态state映射到了Profile组件的props中
connect还可以传入第二个参数,用于将action也映射到props中:
// Profile.jsx
import React, { Component } from 'react'
import { connect } from 'react-redux'
import { INCREMENT, DECREMENT } from './store/constants'

const mapStateToProps = (state) => ({
  count: state.count
})

const mapDispatchToProps = (dispatch) => ({
  increment: () => dispatch({ type: INCREMENT }),
  decrement: () => dispatch({ type: DECREMENT })
})

export default connect(
  mapStateToProps,
  mapDispatchToProps
)(
  class Profile extends Component {
    render() {
      return (
        <div>
          <h2>Profile</h2>
          <p>Count: {this.props.count}</p>
          <button onClick={this.props.increment}> +1 </button>
          <button onClick={this.props.decrement}> -1 </button>
        </div>
      )
    }
  }
)本质上是connect内部对操作进行了封装,把逻辑隐藏起来了:
- 调用
connect这个高阶函数,返回一个高阶组件 - 为高阶组件传入映射目标组件,最后高阶组件返回一个新组件
- 新组件的props包含了来自Store中状态/dispatch的映射
异步Action
有些场景下,我们希望组件能够直接调用Store中的action来触发网络请求,并且获取到数据
但是dispatch只允许派发对象类型的Action,不能通过dispatch派发函数
可以通过中间件redux-thunk来对Redux做增强,让dispatch能够对函数进行派发
npm i redux-thunk通过applyMiddleware引入redux-thunk这个中间件:
// store/index.js
import { createStore, applyMiddleware } from 'redux'
import thunk from 'redux-thunk'
import reducer from './reducer'

const store = createStore(reducer, applyMiddleware(thunk))

export default store// actionFactory.js
export const fetchPostList = () => {
return (dispatch, getState) => {
fetch('https://jsonplaceholder.typicode.com/posts')
.then((res) => res.json())
.then((res) => {
dispatch({
type: actionType.FETCH_POST_LIST,
list: res
})
})
}
}// list.jsx
import React, { Component } from 'react'
import { connect } from 'react-redux'
import { fetchPostList } from './store/actionFactory'
const mapStateToProps = (state) => ({
list: state.list
})
const mapDispatchToProps = (dispatch) => ({
fetchList: () => dispatch(fetchPostList())
})
export default connect(
mapStateToProps,
mapDispatchToProps
)(
class Profile extends Component {
render() {
return (
<div>
<h2>List</h2>
<button onClick={() => this.props.fetchList()}>Fetch List</button>
{this.props.list.length && (
<ul>
{this.props.list.map((item) => (
<li key={item.id}>{item.title}</li>
))}
</ul>
)}
</div>
)
}
}
)- 这样就可以将网络请求的具体逻辑代码隐藏到Redux中
- 将网络请求归于状态管理的一部分
- 而不是书写在组件内,不利于维护,耦合度太高
redux-thunk是如何做到可以让我们发送异步请求的?
- 默认情况下
dispatch(action)的action必须为一个JS对象 redux-thunk允许我们传入一个函数作为action- 函数会被调用,并且将
dispatch函数和getState函数作为入参传递给这个函数actiondispatch允许我们在这之后再次派发actiongetState允许我们之后的一些操作依赖原来的状态,可以获取到之前的状态
下图展示了从组件调用方法,触发patch到Redux接收patch、发送网络请求、更新state的全过程:

拆分Store
拆分Store带来的益处很多,便于多人协作、不同业务逻辑解耦等
在Redux中,拆分Store的本质是拆分不同的reducer函数,之前在使用createStore时,传入的就是reducer函数
之前的Store写法与用法:
// store/index.js
import { createStore } from 'redux'
import reducer from './reducer'

const store = createStore(reducer)

// App.jsx
store.getState().count
store.getState().list
拆分Store后的写法与用法:
// store/index.js
import { createStore, combineReducers } from 'redux'
import counterReducer from './counter'
import postListReducer from './postList'

const reducer = combineReducers({
  counter: counterReducer,
  postList: postListReducer
})

const store = createStore(reducer)

// App.jsx
store.getState().counter.count
store.getState().postList.count拆分为多个Reducer之后,需要首先getState()获取到整个状态树,随后指定获取到不同的模块中的状态
拆分后,不同模块下的文件是保持一致的:
- store/ # Store根目录
  - index.js # 导出 store 位置
  - counter/ # Counter模块
    - actionFactory.js
    - constants.js
    - index.js # 统一导出
    - reducer.js
  - postList/ # PostList模块
    - actionFactory.js
    - constants.js
    - index.js
    - reducer.js
  - ...
combineReducer函数
前面拆分Store时用到了combineReducer函数,将多个模块reducer组合到一起,函数内部是如何处理的?
- 将传入的reducers合并到一个对象中,最终返回一个
combination函数(相当于未拆分时传给createStore的reducer函数) - 在执行
combination函数的过程中,它会通过判断前后返回的数据是否相同来决定返回之前的state还是新的state - 新state会触发订阅者发生对应更新,而旧state可以有效地组织订阅者发生刷新
下面简单写了一下combineReducer的实现原理
// 使用
combineReducer({
  counter: combineReducer,
  postList: postListReducer
})

// 创建一个新的reducer
function reducer(state = {}, action) {
  // 返回一个对象 是Store的state
  return {
    counter: counterReducer(state.counter, action),
    postList: postListReducer(state.postList, action)
  }
}
ReduxToolkit
- ReduxToolkit重构
- ReduxToolkit异步
- connect高阶组件
- 中间件的实现原理
- React状态管理选择
认识ReduxToolkit
之前在使用createStore创建Store时会出现deprecated标识,推荐我们使用@reduxjs/toolkit包中的configureStore函数
Redux Toolkit是官方推荐编写Redux逻辑的方法
- 在前面学习Redux时已经发现,Redux的逻辑编写过于繁琐、麻烦
- 代码分拆在不同模块中,存在大量重复代码
- Redux Toolkit旨在成为编写Redux逻辑的标准方式,从而解决上面提到的问题
- 这个包常被称为:RTK
使用ReduxToolkit重写Store
Redux Toolkit依赖于react-redux包,所以需要同时安装这二者
npm i @reduxjs/toolkit react-reduxRedux Toolkit的核心API主要是下述几个:
configureStore包装createStore以提供简化的配置选项和良好的默认值- 可以自动组合你的slice reducer 添加你提供的任何Redux中间件
- 默认包含redux-thunk,并启用Redux DevTools Extension
createSlice创建切片 片段- 接受reducer函数的对象、切片名称和初始状态值,并自动生成切片reducer,并带有actions
createAsyncThunk- 接受一个动作类型字符串和一个返回Promise的函数
- 并生成一个
pending / fullfilled / rejected基于该承诺分派动作类型的thunk
写一个Demo:
// store/index.js
import { configureStore } from '@reduxjs/toolkit'
import counterSlice from './features/counter'

const store = configureStore({
  reducer: {
    counter: counterSlice
  }
})

export default store// store/features/counter.js
import { createSlice } from '@reduxjs/toolkit'
const counterSlice = createSlice({
name: 'counter',
initialState: {
count: 0
},
reducers: {
addCount(state, action) {
const { payload } = action
state.count += payload
},
subCount(state, action) {
const { payload } = action
state.count -= payload
}
}
})
const { actions, reducer } = counterSlice
export const { addCount, subCount } = actions
export default reducer// Counter.jsx
import React, { Component } from 'react'
import { connect } from 'react-redux'
import { addCount, subCount } from '../store/features/counter'
const mapStateToProps = (state) => ({
count: state.counter.count
})
const mapDispatchToProps = (dispatch) => ({
increment: (count) => {
const action = addCount(count)
return dispatch(action)
},
decrement: (count) => {
const action = subCount(count)
return dispatch(action)
}
})
export default connect(
mapStateToProps,
mapDispatchToProps
)(
class Counter extends Component {
render() {
const { count } = this.props
return (
<div>
<h2>Counter</h2>
<div>count: {count}</div>
<button onClick={() => this.props.increment(1)}>+1</button>
<button onClick={() => this.props.decrement(1)}>-1</button>
</div>
)
}
}
)createSlice 函数参数解读
name标记Slice 展示在dev-tool中initialState初始化状态reducers对象 对应之前的reducer函数- 返回值: 一个对象 包含所有actions
configureStore 解读
reducer将slice中的reducer组成一个对象,传入此参数middleware额外的中间件- RTK已经为我们集成了
redux-thunk和redux-devtool两个中间件
- RTK已经为我们集成了
devTools布尔值 是否启用开发者工具
使用RTK执行异步dispatch
实际场景中都是在组件中发起网络请求,并且将状态更新到Store中
之前的开发中,我们通过redux-thunk这个中间件,让dispatch中可以进行异步操作
ReduxToolkit默认已经给我们集成了Thunk相关的功能:createAsyncThunk
下面我们使用RTK实现一下这个场景:在Profile中请求postList数据并保存在Store中,并展示出来
// store/features/postList.js
import { createSlice, createAsyncThunk } from '@reduxjs/toolkit'

export const fetchPostList = createAsyncThunk('fetch/postList', async () => {
  const url = 'https://jsonplaceholder.typicode.com/posts'
  const data = await fetch(url).then((res) => res.json())
  return data
})

const postListSlice = createSlice({
  name: 'postList',
  initialState: {
    postList: []
  },
  reducers: {
    setPostList(state, { payload }) {
      state.postList = payload
    }
  },
  extraReducers: {
    [fetchPostList.fulfilled]: (state, { payload }) => {
      console.log('payload', payload)
      state.postList = payload
    },
    [fetchPostList.pending]: (state, { payload }) => {
      console.log('fetchPostList.pending', payload)
    },
    [fetchPostList.rejected]: (state, { payload }) => {
      console.log('fetchPostList.rejected', payload)
    }
  }
})

export const { setPostList } = postListSlice.actions

export default postListSlice.reducer// store/index.js
import { configureStore } from '@reduxjs/toolkit'
import counterReducer from './features/counter'
import postListReducer from './features/postList'
export default configureStore({
reducer: {
counter: counterReducer,
postList: postListReducer
}
})// Profile.jsx
import React, { Component } from 'react'
import { connect } from 'react-redux'
import { fetchPostList } from '../store/features/postList'
const mapStateToProps = (state) => ({
postList: state.postList.postList
})
const mapDispatchToProps = (dispatch) => ({
fetchPostList: () => dispatch(fetchPostList())
})
export default connect(
mapStateToProps,
mapDispatchToProps
)(
class Profile extends Component {
render() {
return (
<div>
Profile
<button onClick={() => this.props.fetchPostList()}>Fetch Data</button>
<ul>
{this.props.postList.map((item, index) => (
<li key={index}>{item.title}</li>
))}
</ul>
</div>
)
}
}
)当createAsyncThunk创建出来的action被dispatch时,会存在三种状态:
- pending: action被发出,但是还没有最终的结果
- fulfilled: 获取到最终的结果(有返回值的结果)
- rejected: 执行过程中又错误或者抛出了异常
我们可以在createSlice的entraReducer中监听这些结果,根据派发action后的状态添加不同的逻辑进行处理
除了上述的写法,还可以为extraReducer传入一个函数,函数接收一个builder作为参数,在函数体内添加不同的case来监听异步操作的结果:
// postList.js
...
extraReducers: (builder) => {
  builder.addCase(fetchPostList.fulfilled, (state, { payload }) => {
    state.postList = payload
  })
  builder.addCase(fetchPostList.pending, (state, { payload }) => {
    console.log('fetchPostList.pending', payload)
  })
  builder.addCase(fetchPostList.rejected, (state, { payload }) => {
    console.log('fetchPostList.rejected', payload)
  })
}
...
在之前的代码中,我们都是通过触发action后置的回调来更新state,那么有没有可能在请求完毕时确定性地更新store中的state?
可以当请求有结果了,在请求成功的回调中直接dispatch设置state的action
当我们通过dispatch触发异步action时可以传递额外的参数,这些参数可以在传入createAsyncThunk的回调函数的参数中获取到,同时也可以从函数的参数中获取到dispatch与getState函数,这样就可以在请求到数据后直接通过派发action的方式更新store中的state,下面是修改后的例子:
// postList.js
import { createSlice, createAsyncThunk } from '@reduxjs/toolkit'

export const fetchPostList = createAsyncThunk(
  'fetch/postList',
  async (extraInfo, { dispatch, getState }) => {
    const url = 'https://jsonplaceholder.typicode.com/posts'
    const data = await fetch(url).then((res) => res.json())
    dispatch(setPostList(data))
  }
)

const postListSlice = createSlice({
  name: 'postList',
  initialState: {
    postList: []
  },
  reducers: {
    setPostList(state, { payload }) {
      state.postList = payload
    }
  }
})

export const { setPostList } = postListSlice.actions

export default postListSlice.reducer当然,此时异步action的状态已经不那么重要了,也就不必再return data了,除非你需要对异常状态做额外处理,仍然可以在extraReducers中添加异常处理回调
Redux Toolkit的数据不可变性
Redux Toolkit本质是对之前繁琐的操作进行的一次封装
我们注意到:在之前reducer对state进行更新时,必须返回一个新的state才能触发修改state = { ...state, count: count + 1 },但是经过Redux Toolkit的封装,我们只需要state.count += 1,直接对状态进行赋值就可以完成状态的更新
这是因为在RTK内部使用了immutable.js,数据不可变性
- 在React开发中,我们总是强调数据的不可变性
- 无论是类组件中的state还是redux中管理的state
- JS的编码过程里,数据的不可变性都是非常重要的
- 所以在之前我们更新state时都是通过浅拷贝来完成的
- 但是浅拷贝也存在它的缺陷:
- 当对象过大时,进行浅拷贝会造成性能的浪费
- 浅拷贝后的新对象,其深层属性仍然是旧对象的引用
Redux Toolkit底层使用了immerjs库来保证数据的不可变性
immutablejs库的底层原理和使用方法:React系列十八 - Redux(四)state如何管理
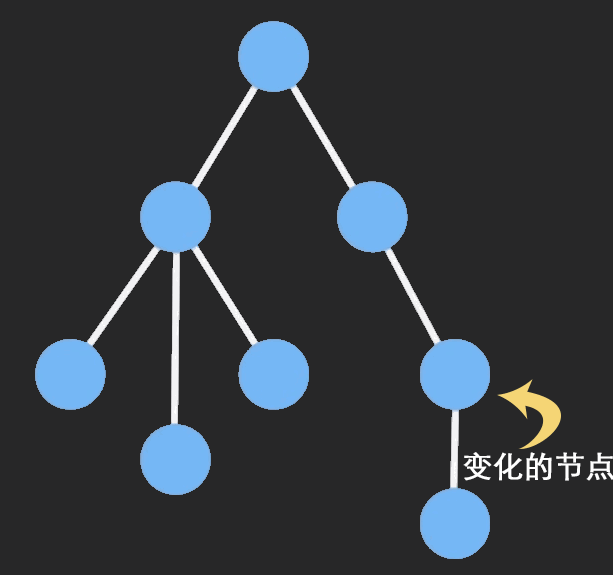
为了节约内存,出现了新的算法Persistent Data Structure持久化数据结构/一致性数据结构
- 用一种数据结构来保存数据
- 当数据被修改时,会返回一个新的对象,但是新的对象会尽可能复用之前的数据结构而不会对内存进行浪费
- 比如有一棵引用层级较深的树,当我们对其深层某个节点进行修改时,不会完全拷贝整棵树,而是在尽可能复用旧树结构的同时创建一棵新的树
一图胜千言:
connect的实现原理
connect函数是react-redux提供的一个高阶函数,它返回一个高阶组件,用于将store中的state/dispatch映射为组件的props
下面一步一步手写一个connect函数,实现和库提供的connect一样的映射功能:
首先完成基本的代码搭建,connect函数接收两个参数mapStateToProps mapDispatchToProps返回一个高阶组件
所谓高阶组件,就是传入一个类组件,返回一个增强后的新的类组件:
// connect.js
import { PureComponent } from 'react'

export default function connect(mapStateToProps, mapDispatchToProps) {
  return (WrapperComponent) =>
    class InnerComponent extends PureComponent {
      render() {
        return <WrapperComponent {...this.props} />
      }
    }
}其中,mapStateToProps和mapDispatchToProps都是函数,函数入参是state与dispatch,返回一个对象,键值对对应prop <=> state/dispatch调用
我们导入store,并且从store中获取到state和dispatch传入mapStateToProps和mapDispatchToProps,随后将得到的键值对以props形式传递给WrapperComponent
这样新组件就可以拿到这些状态与dispatch方法,我们可以在componentDidMount中监听整个store,当store中的状态发生改变时,强制执行re-render
// connect.js
import { PureComponent } from 'react'
import store from '../store'

export default function connect(mapStateToProps, mapDispatchToProps) {
  return (WrapperComponent) =>
    class InnerComponent extends PureComponent {
      componentDidMount() {
        store.subscribe(() => this.forceUpdate())
      }

      render() {
        const state = mapStateToProps(store.getState())
        const dispatch = mapDispatchToProps(store.dispatch)
        return <WrapperComponent {...this.props} {...state} {...dispatch} />
      }
    }
}
上述代码能够正常工作,但是显然每次store内state发生改变都re-render是不明智的,因为组件可能只用到了store中的某些状态
那些组件没有用到的其他状态发生改变时,组件不应该也跟着re-render,这里可以做一些优化
// connect.js
import { PureComponent } from 'react'
import store from '../store'

export default function connect(mapStateToProps, mapDispatchToProps) {
  return (WrapperComponent) =>
    class InnerComponent extends PureComponent {
      constructor(props) {
        super(props)
        this.state = mapStateToProps(store.getState())
      }

      componentDidMount() {
        store.subscribe(() => {
          this.setState(mapStateToProps(store.getState()))
        })
      }

      render() {
        const state = mapStateToProps(store.getState())
        const dispatch = mapDispatchToProps(store.dispatch)

        return <WrapperComponent {...this.props} {...state} {...dispatch} />
      }
    }
}
经过优化后,每次store.state发生变化会触发setState,由React内部的机制来决定组件是否应当重新渲染
如果组件依赖的state发生变化了,那么React会替我们执行re-render,而不是每次都强制执行re-render
进一步地,我们可以补充更多细节:
- 当组件卸载时解除监听
store.subscribe会返回一个unsubscribe函数 用于解除监听
- 解除与业务代码store的耦合
- 目前的store来自业务代码 更优的做法是从context中动态获取到store
- 应当提供一个context Provider供用户使用
- 就像
react-redux一样,使用connect前需要将App用Provider包裹并传入store
至此就基本完成了一个connect函数
// connect.js
import { PureComponent } from 'react'
import { StoreContext } from './storeContext'

export function connect(mapStateToProps, mapDispatchToProps) {
  return (WrapperComponent) => {
    class InnerComponent extends PureComponent {
      constructor(props, context) {
        super(props)
        this.state = mapStateToProps(context.getState())
      }

      componentDidMount() {
        this.unsubscribe = this.context.subscribe(() => {
          this.setState(mapStateToProps(this.context.getState()))
        })
      }

      componentWillUnmount() {
        this.unsubscribe()
      }

      render() {
        const state = mapStateToProps(this.context.getState())
        const dispatch = mapDispatchToProps(this.context.dispatch)

        return <WrapperComponent {...this.props} {...state} {...dispatch} />
      }
    }

    InnerComponent.contextType = StoreContext

    return InnerComponent
  }
}// storeContext.js
import { createContext } from 'react'
export const StoreContext = createContext(null)
export const Provider = StoreContext.Provider// App.jsx
import React, { Component } from 'react'
import store from './store'
import Counter from './cpns/Counter'
import { Provider } from './hoc'
export default class App extends Component {
render() {
return (
<Provider value={store}>
<div>
<h1>React Redux</h1>
<Counter />
</div>
</Provider>
)
}
}实现日志中间件logger
设想现在有需求:设计一个Redux中间件,当我们每次通过dispatch派发action时都能够在控制台输出:派发了哪个action,传递的数据是怎样的
最终实现:拦截dispatch,并且在控制台打印派发的action
// logger.js
function logger(store) {
  const next = store.dispatch // 保留原始的dispatch函数
  function dispatchWithLog(action) {
    console.group(action.type)
    console.log('dispatching', action)
    const res = next.dispatch(action)
    console.log('next state', store.getState())
    console.groupEnd()
    return res
  }
  store.dispatch = dispatchWithLog
}

logger(store) // 应用中间件通过monkey patch对原始dispatch函数进行了修改,为函数添加额外的副作用
实现redux-thunk
redux-thunk这个库帮我们提供了派发异步函数的功能
回顾一下redux-thunk的功能:
- 默认情况下dispatch(action)的action必须为一个JS对象
- redux-thunk允许我们传入一个函数作为action
- 函数会被调用,并且将dispatch函数和getState函数作为入参传递给这个函数action
- dispatch 允许我们在这之后再次派发action
- getState 允许我们之后的一些操作依赖原来的状态,可以获取到之前的状态
// thunk.js
function thunk(store) {
  const next = store.dispatch
  function dispatchWithThunk(action) {
    if (typeof action === 'function') {
      // pass dispatch and getState to the thunk
      return action(store.dispatch, store.getState)
    }
    return next(action)
  }
  return dispatchWithThunk
}

thunk(store) // 应用中间件需要注意的是,传递给函数action的第一个参数是经过更新后的新的dispatch函数,这是从细节考虑:如果在函数中又派发了函数
实现applyMiddleware
当我们需要同时应用多个中间件时,可以用applyMiddleware来对多个中间件进行组合,统一进行注册
// applyMiddleware.js
function applyMiddleware(store, ...fns) {
  fns.forEach(fn => fn(store))
}

applyMiddleware(store, logger, thunk) // 使用applyMiddleware